Love this? Save it for later!
Share the inspiration with your friends
Introduction
“You won’t believe how much I spent on veggies this week,” my friend Lisa groaned as we compared grocery hauls last Saturday morning. We were at the bustling farmer’s market downtown, surrounded by the vibrant colors of summer produce. She held a small bag of cherry tomatoes and some green beans, clearly frustrated by the price. It reminded me of the time I stood in my own kitchen, staring at a fridge full of wilting vegetables and a receipt that made me wince. Honestly, budgeting for fresh vegetables felt like a juggling act—until I stumbled on a simple prep routine that changed the game.
I wasn’t expecting a quick fix from a casual chat with the vendor, who casually mentioned how prepping veggies in bulk during their peak season saved him money and hassle during the lean months. That little nugget stuck with me, and after a few trial runs—complete with a few messy counters and a forgotten cutting board—I found a rhythm that not only saved money but made weekday meals a breeze. Maybe you’ve been there too—trying to eat healthy on a tight budget but feeling overwhelmed by spoilage and cost.
This easy budget vegetable prep method isn’t about complicated recipes or fancy gadgets. It’s about smart choices that respect the seasons, simple storage hacks, and a bit of hands-on prep that pays off all week long. Let me tell you, once you get this down, grocery shopping and meal planning suddenly feel way less stressful—and your wallet will thank you. So whether you’re a newbie in the kitchen or just looking for ways to cut food costs, this approach might be the kitchen hack you didn’t know you needed.
Why You’ll Love This Recipe
After testing this vegetable prep method through several seasons (and yes, a few trial-and-error experiments that ended in a fridge full of limp veggies), I can confidently say it’s one of the most practical ways to save money while still enjoying fresh produce.
- Quick & Easy: The bulk prep takes about an hour on your day off, setting you up for stress-free meals all week.
- Simple Ingredients: No exotic veggies or pricey superfoods—just seasonal, affordable produce from your local market or store.
- Perfect for Meal Planning: Prep once, use throughout the week for salads, stir-fries, soups, or snacks.
- Crowd-Pleaser: Keeps veggies crisp and fresh, so everyone in the family (even picky eaters) will reach for them.
- Unbelievably Practical: Reduces food waste, cuts down on last-minute grocery runs, and stretches your budget further.
What makes this method different? It’s the focus on seasonal savings paired with smart prepping techniques—like blanching, proper chopping sizes, and airtight storage—that keep your veggies tasting fresh and vibrant beyond what you’d expect. Honestly, it’s the kind of routine that turns kitchen chaos into calm, especially when life gets busy. Give it a try, and you might find yourself closing your eyes after the first crisp bite of perfectly prepped carrots or peppers, thinking, “Why didn’t I do this sooner?”
What Ingredients You Will Need
This vegetable prep uses simple, wholesome ingredients to deliver fresh flavor and satisfying texture without fuss. The key is focusing on seasonal veggies that are budget-friendly and easy to store.
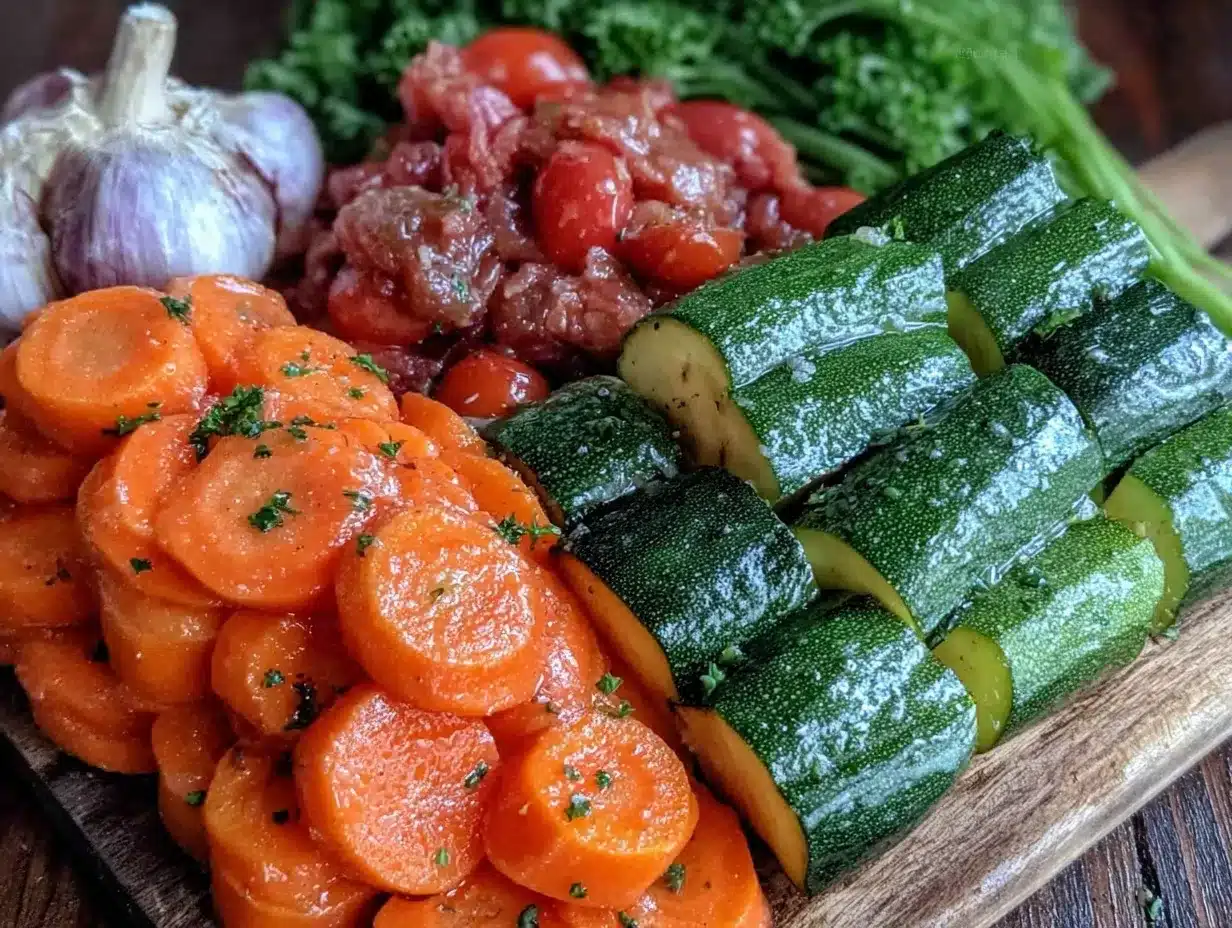
- Carrots: peeled and cut into sticks or rounds (adds sweet crunch)
- Bell Peppers: any color, seeded and sliced (great raw or cooked)
- Broccoli Florets: trimmed into bite-sized pieces (blanched to keep color and texture)
- Zucchini: sliced into half-moons (versatile for many dishes)
- Green Beans: trimmed and blanched (keeps vibrant green and crisp)
- Cherry Tomatoes: washed and left whole (perfect for snacking)
- Cauliflower Florets: cut small (useful for salads or roasting)
- Fresh Herbs: like parsley or cilantro, roughly chopped (adds freshness)
- Lemon Juice: a splash to brighten certain veggies during prep (optional)
Most of these are common veggies you can find year-round, but picking them in season (spring peas, summer peppers, fall squash) makes a big difference in price and flavor. I usually shop at my local co-op or farmer’s market on Wednesdays when there’s a fresh drop, but if you’re grabbing from the grocery store, look for firm, vibrant produce without blemishes.
For substitutions, if you’re avoiding nightshades, swap bell peppers and tomatoes for cucumbers or snap peas. If you prefer organic, brands like Earthbound Farm or local growers in your area are solid bets. I recommend prepping these veggies fresh but storing them properly so they last—because honestly, nothing’s worse than buying fresh and watching it go bad in days.
Equipment Needed
- Sharp Chef’s Knife: A good knife makes chopping fast and safe. I use a 8-inch chef’s knife from Victorinox that’s held up well for years.
- Cutting Boards: At least two—one for veggies, one for herbs or other prep—to avoid cross-contamination.
- Large Mixing Bowls: For washing and tossing vegetables during prep.
- Colander or Salad Spinner: Essential for washing and drying leafy greens or herbs thoroughly.
- Blanching Pot or Large Saucepan: For quickly cooking and shocking vegetables like broccoli and green beans.
- Ice Bath Container: A large bowl filled with ice water to stop cooking after blanching.
- Airtight Storage Containers or Zip-Top Bags: Glass containers are my favorite for longevity and non-staining, but BPA-free plastic bags work too.
If you don’t have a blanching pot, a large saucepan with a lid works fine. Just keep an eye on timing to avoid overcooking. For budget options, thrift stores often have durable cutting boards and mixing bowls for a fraction of retail price. Keeping knives sharp is key—honestly, a dull knife is more dangerous and slows down your prep.
Preparation Method
- Wash All Vegetables Thoroughly: Rinse under cold water and use a salad spinner for leafy herbs to remove dirt and grit. This step is crucial to keep your veggies fresh and clean. (5 minutes)
- Peel and Chop Root Vegetables: Peel carrots and slice into sticks or rounds about ¼ to ½ inch thick for even cooking and snacking ease. Chop cauliflower and broccoli into bite-sized florets. Keep pieces uniform to ensure consistent texture. (10-15 minutes)
- Prepare Soft Vegetables: Slice bell peppers, zucchini, and green beans into manageable pieces. For green beans and broccoli, blanch in boiling salted water for 1-2 minutes until bright green and slightly tender but still crisp. Immediately transfer to an ice bath to stop cooking and preserve color. (10 minutes)
- Dry Vegetables Completely: Use clean kitchen towels or a salad spinner to remove excess moisture. This prevents sogginess and extends fridge life.
- Optional Herb Prep: Roughly chop fresh parsley or cilantro and toss lightly with a splash of lemon juice to brighten flavor. Store separately to avoid wilting.
- Pack and Store: Divide prepped veggies into airtight containers or zip-top bags. Layering dry paper towels on the bottom helps absorb moisture, which keeps your vegetables crisp longer. Label containers with the prep date for easy tracking. (5 minutes)
- Refrigerate Immediately: Store containers in the fridge’s crisper drawer where humidity is controlled. Most prepped veggies last 5-7 days this way.
Pro tip: If you plan to roast or cook some veggies later, keep them slightly larger so they don’t overcook when reheated. I learned this the hard way after a batch of mushy zucchini nearly ruined dinner one night!
Cooking Tips & Techniques
When prepping vegetables for weekly use, timing and technique can make or break the results. Here are some tips I picked up along the way:
- Blanching is Your Best Friend: It locks in color, texture, and nutrients especially for green beans and broccoli. But don’t overdo it—just a quick dip in boiling water is enough.
- Cut Uniformly: Uneven pieces cook unevenly, so chop your veggies in consistent sizes. This simple step makes cooking and reheating more predictable.
- Dry Well Before Storage: Excess moisture causes veggies to spoil quickly. Using paper towels inside containers absorbs residual dampness.
- Invest in Good Storage: Airtight glass containers keep odors out and freshness in. I once tried storing in flimsy plastic bags and ended up with wilted messes.
- Prep on a Clean, Spacious Surface: It sounds obvious, but a cluttered kitchen slows you down and leads to mistakes. I often clear off the dining table for big prep days.
- Multitask Smartly: While veggies blanch, prep herbs or wash next batch to save time.
- Keep a Sharp Knife Handy: It reduces accidents and speeds up chopping dramatically.
Remember, this prep is all about making your life easier, so if you find a step too time-consuming, tweak it to fit your routine. The goal is fresh veggies ready to grab and go, not a full-time job.
Variations & Adaptations
One of the best things about this method is how adaptable it is to different diets and preferences. Here are a few ways you can customize:
- Gluten-Free or Paleo: Stick to just fresh veggies and herbs—no breading or sauces needed.
- Seasonal Swaps: In fall, swap zucchini for butternut squash or sweet potatoes. Winter? Try prepping Brussels sprouts or kale.
- Flavor Boosters: Add a sprinkle of smoked paprika or a drizzle of balsamic vinegar before storing for a subtle twist.
- Allergen-Friendly: Avoid nuts or seeds if you need to, or swap lemon juice with apple cider vinegar if citrus is a concern.
- Personal Favorite: I like to mix in some quick-pickled red onions with the batch for a tangy kick that livens up salads and wraps.
Adjust cooking times as needed if you decide to roast or sauté prepped veggies later. This flexibility means you can keep your meals interesting without extra prep time.
Serving & Storage Suggestions
Prepped vegetables are best enjoyed within the first week, stored in the crisper drawer at 35-40°F (1.5-4°C) for optimal freshness. Serve them chilled for salads or room temperature for snacking. For cooked dishes, toss them into stir-fries, pasta, or roast them with a little olive oil and your favorite spices.
When reheating, use medium heat to avoid overcooking. Steaming or sautéing quickly preserves texture. Leftovers can be stored in airtight containers in the fridge for up to 3 days or frozen for up to 3 months, although freezing may change texture slightly.
Flavors often deepen after a day or two as the veggies absorb any dressings or seasonings you add. I find that prepped veggies taste best when used within 5 days, but some sturdier ones like carrots and cauliflower can hold up longer.
Nutritional Information & Benefits
This vegetable prep method delivers a nutrient-rich, low-calorie foundation for meals. Vegetables like broccoli and carrots are packed with fiber, vitamins A and C, and antioxidants that support immune health and digestion. Bell peppers add a boost of vitamin C and folate, while zucchini provides hydration with its high water content.
Since this prep avoids added fats or sugars, it fits well with most dietary plans including vegan, vegetarian, gluten-free, and low-carb. Just watch for any dressings or dips you pair with your veggies if you’re counting calories.
Personally, I feel good knowing that this strategy helps reduce food waste and stretches my grocery budget without sacrificing flavor or nutrition. It’s a win-win for both my health and my wallet.
Conclusion
Easy budget vegetable prep for seasonal savings isn’t just a kitchen hack—it’s a way to take control of your food budget, reduce waste, and enjoy fresh, wholesome veggies all week long. Whether you’re new to meal prep or looking for a straightforward routine, this method offers a practical path to healthier eating without the stress.
Personally, I keep coming back to this approach because it saves time, money, and makes weekday meals feel less rushed. You can tweak it to fit your tastes and schedule, making it truly your own. Give it a shot, and don’t hesitate to share your own twists or questions below—I’d love to hear how it works in your kitchen!
Remember, small changes like these add up to big savings and better eating habits. Happy prepping!
FAQs
How long do prepped vegetables last in the fridge?
Most prepped veggies last 5-7 days when stored in airtight containers in the crisper drawer. Blanched veggies like broccoli and green beans maintain texture best.
Can I freeze prepped vegetables for later use?
Yes, you can freeze most blanched vegetables in freezer-safe bags for up to 3 months. Keep in mind the texture may become softer after thawing.
What’s the best way to keep vegetables crisp after prepping?
Dry them thoroughly before storing and use paper towels inside your containers to absorb moisture, which helps maintain crispness.
Can I prep vegetables ahead if I have limited fridge space?
Consider prepping smaller batches or storing vegetables in stackable containers to save space. Alternatively, prep just what you’ll use within a few days.
Are there vegetables you shouldn’t prep in advance?
Leafy greens like spinach and delicate herbs wilt quickly and are best washed and chopped just before use. Tomatoes also lose texture if sliced too early.
Pin This Recipe!

Easy Budget Vegetable Prep for Seasonal Savings to Cut Food Costs
A simple and practical vegetable prep method that saves money, reduces waste, and keeps veggies fresh all week long using seasonal produce and smart storage techniques.
- Prep Time: 30 minutes
- Cook Time: 10 minutes
- Total Time: 40 minutes
- Yield: 6 servings
- Category: Meal Prep
- Cuisine: American
Ingredients
- Carrots: peeled and cut into sticks or rounds
- Bell Peppers: any color, seeded and sliced
- Broccoli Florets: trimmed into bite-sized pieces
- Zucchini: sliced into half-moons
- Green Beans: trimmed and blanched
- Cherry Tomatoes: washed and left whole
- Cauliflower Florets: cut small
- Fresh Herbs: parsley or cilantro, roughly chopped
- Lemon Juice: a splash (optional)
Instructions
- Wash all vegetables thoroughly under cold water and use a salad spinner for leafy herbs to remove dirt and grit. (5 minutes)
- Peel carrots and slice into sticks or rounds about 1/4 to 1/2 inch thick. Chop cauliflower and broccoli into bite-sized florets, keeping pieces uniform. (10-15 minutes)
- Slice bell peppers, zucchini, and green beans into manageable pieces. Blanch green beans and broccoli in boiling salted water for 1-2 minutes until bright green and slightly tender but still crisp. Immediately transfer to an ice bath to stop cooking and preserve color. (10 minutes)
- Dry vegetables completely using clean kitchen towels or a salad spinner to remove excess moisture.
- Optionally, roughly chop fresh parsley or cilantro and toss lightly with a splash of lemon juice. Store separately to avoid wilting.
- Divide prepped veggies into airtight containers or zip-top bags. Layer dry paper towels on the bottom to absorb moisture and keep vegetables crisp longer. Label containers with the prep date. (5 minutes)
- Refrigerate immediately in the fridge’s crisper drawer where humidity is controlled. Most prepped veggies last 5-7 days.
Notes
Blanch green beans and broccoli briefly to lock in color and texture. Dry vegetables thoroughly before storage to prevent sogginess. Use paper towels inside containers to absorb moisture and keep veggies crisp. Label containers with prep date. Store in crisper drawer at 35-40°F. Prepped veggies last 5-7 days refrigerated and up to 3 months frozen (texture may soften). Adjust chopping size if planning to roast or sauté later to avoid overcooking.
Nutrition
- Serving Size: Approximately 1 cup
- Calories: 50
- Sugar: 5
- Sodium: 30
- Fat: 0.2
- Carbohydrates: 11
- Fiber: 3.5
- Protein: 2
Keywords: vegetable prep, budget cooking, seasonal vegetables, meal prep, blanching, food storage, healthy eating, reduce food waste