Love this? Save it for later!
Share the inspiration with your friends
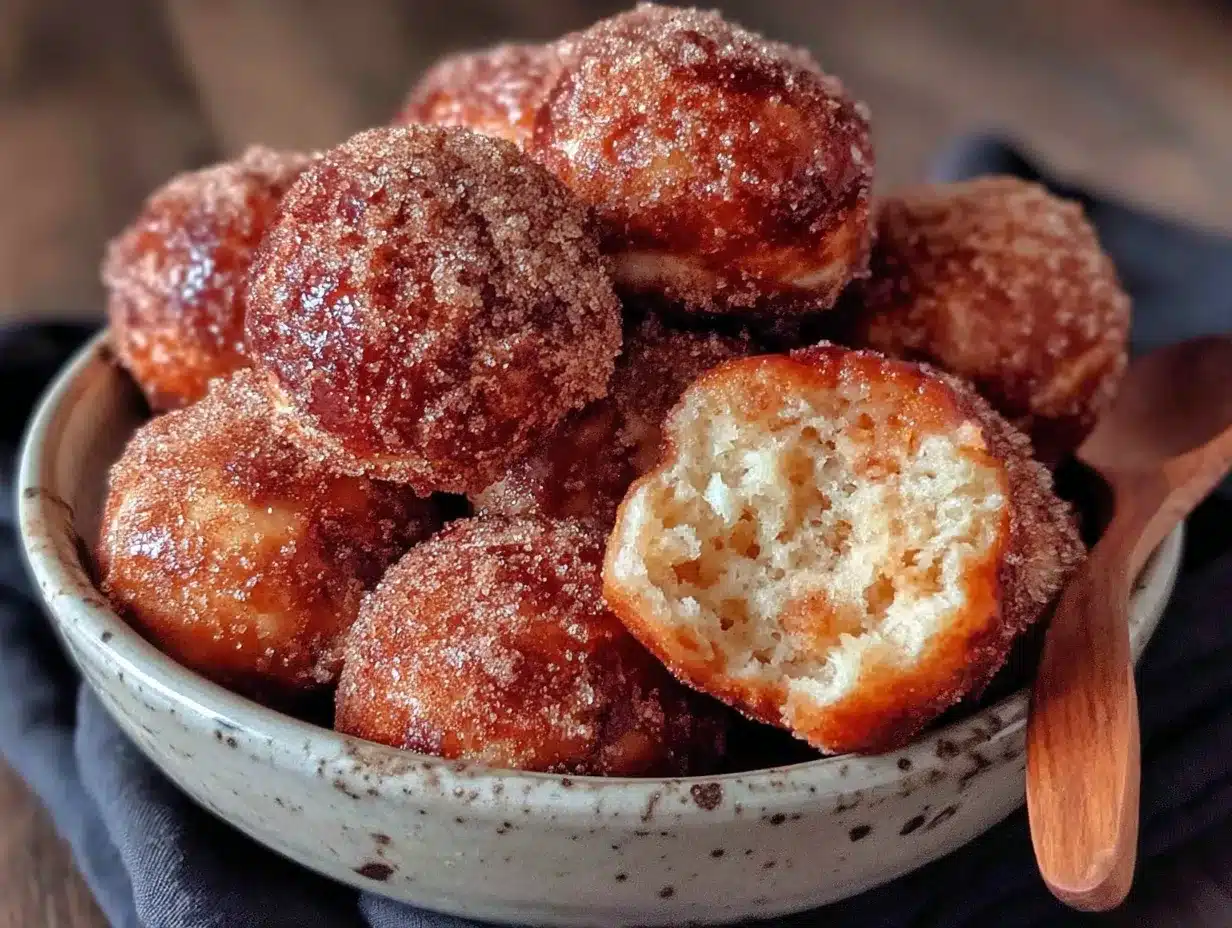
Last October, I stopped by my neighbor Kate’s house to borrow a bag of sugar—classic baking emergency, right? She waved me in from the kitchen, and the smell hit me before I even got past her front door. Warm cinnamon, nutmeg, something sweet and almost yeasty but not quite. She was pulling a baking sheet out of the oven, and these little golden spheres were sitting there, glistening. “Oh, those are just donut holes,” she said, like she’d boiled an egg. She tossed them in a bag of cinnamon sugar while they were still hot, barely looking at what she was doing. I stood there holding my bag of sugar, completely distracted. She handed me a warm one, still steaming, and I honestly forgot why I’d even come over. The outside had that delicate, shattery crunch from the cinnamon sugar, and the inside was so soft and tender, almost like a little cloud. I asked her for the recipe, and she said, “Pumpkin. Canned. It’s nothing special.” But it was. It really was. Maybe you’ve had that moment where something so simple stops you in your tracks. That’s what these baked cinnamon sugar pumpkin donut holes did to me. I’ve been making them every fall since, and they’ve never once let me down.
Why You’ll Love This Recipe
Let me tell you why these little guys have become my go-to fall treat. I’ve tested this recipe about seven times now, tweaking the flour ratio and the spice blend until it was just right. Here’s what makes them stand out:
- Baked, Not Fried: No deep fryer, no messy oil, no greasy fingers. These come together in the oven, which means less cleanup and way less guilt.
- Quick & Easy: From mixing bowl to your mouth in under 30 minutes. Seriously, the batter comes together in one bowl, and you don’t even need a mixer.
- Simple Ingredients: Canned pumpkin, pantry spices, basic flour, sugar, and eggs. Nothing fancy, nothing you have to hunt down at a specialty store.
- Perfect for Fall Mornings: These are amazing with a hot cup of coffee on a crisp October morning. They also work for brunch, bake sales, or just because it’s Tuesday.
- Crowd-Pleaser: I’ve brought these to two different gatherings, and both times, the plate was empty within fifteen minutes. Kids love them, adults pretend they’re only having one, and then they have three.
- Unbelievably Delicious: The texture is the real star here. The outside gets this delicate, crackly cinnamon sugar coating, while the inside stays incredibly moist and tender. It’s that contrast that makes you reach for another one.
This isn’t just another pumpkin recipe. The trick here is using a specific ratio of pumpkin to flour that keeps the donut holes light instead of dense. I learned that the hard way—my first batch came out like little pumpkin hockey pucks. Not cute. This version? It’s the one that makes you close your eyes after the first bite. It’s comfort food, but faster and easier, with the same soul-soothing satisfaction.
What Ingredients You Will Need
This recipe uses simple, wholesome ingredients to deliver that warm, spiced flavor and tender texture. Most of these are probably already in your pantry, especially if you’re a fall baking enthusiast. Let’s break down what you’ll need and why each ingredient matters.
For the Donut Holes
- All-purpose flour, 1 ½ cups (180g): This gives the donut holes their structure. I’ve tested this with half whole wheat pastry flour, and it works, but all-purpose gives the softest texture. Spoon and level your flour—don’t scoop directly from the bag, or you’ll end up with dense donuts.
- Granulated sugar, ½ cup (100g): Adds sweetness and helps with browning. You can reduce this to ⅓ cup if you prefer less sweet donuts, but the coating adds most of the sweetness anyway.
- Baking powder, 1 ½ teaspoons: This is our leavening agent. Make sure it’s fresh—if it’s been sitting in your cabinet for two years, it might not give you the rise you want.
- Pumpkin pie spice, 1 ½ teaspoons: You can use store-bought or make your own blend. I like using a mix of cinnamon, nutmeg, ginger, and a tiny pinch of cloves. (I actually prefer making my own, but store-bought works perfectly fine.)
- Cinnamon, ½ teaspoon: Adds that extra warm note. I use Ceylon cinnamon for a milder flavor, but Cassia works great too.
- Salt, ½ teaspoon: Don’t skip this. Salt balances the sweetness and enhances all the warm spices.
- Pumpkin puree, ¾ cup (170g): Use canned pumpkin puree, not pumpkin pie filling. The puree adds moisture and that earthy pumpkin flavor without being overpowering. I recommend Libby’s for consistent results—it’s not too watery.
- Large egg, 1: Binds everything together and adds richness. Let it come to room temperature for best results.
- Milk, ¼ cup (60ml): Adds moisture. You can use any milk you have—dairy, almond, oat, whatever. I’ve used 2% and whole milk, and both work. For dairy-free, oat milk gives the best texture.
- Melted butter, 2 tablespoons (28g): Adds richness and helps with browning. You can use coconut oil for a dairy-free version, but butter gives the best flavor.
- Vanilla extract, 1 teaspoon: Enhances the sweetness and rounds out the flavors. Use pure vanilla extract if you can—it makes a noticeable difference.
For the Cinnamon Sugar Coating
- Melted butter, 3 tablespoons (42g): This helps the cinnamon sugar stick to the warm donut holes. Use salted or unsalted—either works.
- Granulated sugar, ½ cup (100g): The base of the coating. You can use coconut sugar for a less refined option, but the texture won’t be quite as crunchy.
- Cinnamon, 1 ½ teaspoons: The star of the coating. Feel free to add an extra ½ teaspoon if you love cinnamon as much as I do.
Equipment Needed
You don’t need anything fancy for this recipe, which is part of why I love it. Here’s what you’ll need:
- Mixing bowls: One medium bowl for dry ingredients and one small bowl for wet ingredients. I use glass bowls because they’re easy to clean and don’t hold onto smells.
- Whisk: For combining the dry ingredients. A fork works in a pinch, but a whisk gives you a more even distribution of the baking powder and spices.
- Mini muffin tin: This is essential. You need a 24-cup mini muffin tin for this recipe. I have a non-stick one from Wilton that I’ve had for years, and it works perfectly. If you don’t have one, you can find them at most grocery stores for under $10.
- Cookie scoop or small spoon: For portioning the batter into the mini muffin cups. A 1-tablespoon cookie scoop is ideal for consistent sizing. I use a small trigger scoop, and it makes the process so much faster.
- Pastry brush: For brushing the melted butter onto the warm donut holes. You can also dip them directly into the butter, but brushing gives you more control and uses less butter.
- Ziploc bag or shallow dish: For the cinnamon sugar coating. I like using a Ziploc bag because you can shake it gently to coat the donut holes evenly without making a mess. A shallow bowl works too.
- Cooling rack: Optional but helpful. Letting the donut holes cool slightly on a rack before coating prevents the coating from getting soggy.
Preparation Method
Alright, let’s get to the fun part. I’ve broken this down into clear steps with all the little details I wish someone had told me the first time. Trust me, follow these, and you’ll have perfect donut holes every time.
- Preheat your oven to 350°F (175°C). Spray your mini muffin tin generously with non-stick spray. I use the kind with flour in it for extra insurance. Don’t skip the spray—these little guys like to stick if you’re not careful.
- In a medium mixing bowl, whisk together the dry ingredients: 1 ½ cups all-purpose flour, ½ cup granulated sugar, 1 ½ teaspoons baking powder, 1 ½ teaspoons pumpkin pie spice, ½ teaspoon cinnamon, and ½ teaspoon salt. Whisk until everything is evenly combined. This takes about 30 seconds. Make sure there are no lumps of baking powder hiding at the bottom.
- In a separate small bowl, whisk together the wet ingredients: ¾ cup pumpkin puree, 1 large egg, ¼ cup milk, 2 tablespoons melted butter, and 1 teaspoon vanilla extract. Whisk until smooth. The mixture will be thick and smell amazing already.
- Pour the wet ingredients into the dry ingredients. Stir with a spatula or wooden spoon until just combined. Do not overmix. A few lumps are totally fine—overmixing will make the donut holes tough. The batter will be thick, almost like a drop biscuit dough. That’s exactly what you want.
- Fill the mini muffin cups. Using a 1-tablespoon cookie scoop or a small spoon, divide the batter evenly among the 24 mini muffin cups. Each cup should be about ¾ full. Don’t overfill, or they’ll rise into little mushroom tops instead of round domes. I learned this the hard way my first time.
- Bake for 8-10 minutes. Start checking at 8 minutes. The donut holes are done when a toothpick inserted into the center comes out clean or with just a few moist crumbs. The tops will be set and lightly golden. Don’t overbake—they’ll dry out quickly.
- Let them cool in the pan for 2 minutes. This is important. If you try to remove them immediately, they’ll fall apart. After 2 minutes, use a small offset spatula or a butter knife to gently loosen the edges and transfer them to a cooling rack.
- While they’re still warm (but not scorching hot), brush each donut hole with melted butter. I melt 3 tablespoons of butter in a small bowl and use a pastry brush to coat each one. You want them evenly coated but not dripping.
- Place the warm, buttered donut holes in a Ziploc bag with the cinnamon sugar mixture. For the coating, combine ½ cup granulated sugar and 1 ½ teaspoons cinnamon in the bag. Seal the bag and gently shake to coat each donut hole evenly. If you don’t have a bag, you can roll them in a shallow bowl of the mixture, but the bag method is way less messy.
- Transfer the coated donut holes to a plate or serving platter. Let them cool for another 2-3 minutes before serving. The coating will set slightly, giving you that perfect crackly exterior.
Cooking Tips & Techniques
I’ve made this recipe enough times to know where things can go wrong. Here are my best tips to ensure success every time:
Don’t overmix the batter. This is the number one mistake I see. Stir until the flour is just incorporated. A few streaks of flour are fine. Overmixing develops gluten, which makes the donut holes tough and dense instead of light and tender. I speak from experience—my first batch was chewy, and not in a good way.
Use room temperature ingredients. Cold eggs and cold milk can cause the melted butter to solidify into little chunks when you mix everything together. Let your egg and milk sit on the counter for 15 minutes before starting. It makes a noticeable difference in the texture.
Check your baking powder freshness. If your baking powder is more than six months old, it might not give you the rise you need. To test it, drop a teaspoon of baking powder into a small bowl of hot water. If it bubbles vigorously, it’s still good. If it barely fizzes, toss it and buy a new can.
Work quickly when coating. The butter needs to be warm and the donut holes need to be warm for the cinnamon sugar to stick properly. If they cool down too much, the sugar won’t adhere as well. I like to coat them in batches of 6-8 at a time.
Use a cookie scoop for consistent sizing. This isn’t just about aesthetics—consistent sizing ensures even baking. If some are larger than others, the small ones will overbake while the big ones are still raw in the center. A 1-tablespoon scoop is your best friend here.
Let them cool in the pan for exactly 2 minutes. Any less, and they’ll fall apart when you try to remove them. Any more, and they’ll stick to the pan. Trust the 2-minute rule—it’s the sweet spot.
Variations & Adaptations
One of the best things about this recipe is how adaptable it is. Here are some variations I’ve tried and loved:
Gluten-Free Version: Substitute the all-purpose flour with a 1:1 gluten-free baking flour blend. I’ve used Bob’s Red Mill 1:1 Baking Flour, and it works beautifully. The texture is slightly more delicate, but the flavor is spot on. Add an extra tablespoon of milk to compensate for the extra absorbency of gluten-free flours.
Dairy-Free Version: Use melted coconut oil or vegan butter instead of regular butter. For the milk, use oat milk or almond milk. I’ve tested this with oat milk, and honestly, I couldn’t tell the difference. For the coating, use melted coconut oil instead of butter—it still gives that nice sheen and helps the sugar stick.
Spiced Sugar Coating: Add a pinch of nutmeg, ginger, or cardamom to the cinnamon sugar mixture. I love adding a tiny pinch of cardamom—it gives the coating a warm, slightly floral note that pairs beautifully with the pumpkin.
Chocolate Drizzle: Once the donut holes are coated and cooled, drizzle them with melted dark chocolate. It sounds indulgent, and it is, but the combination of pumpkin spice and dark chocolate is absolutely divine. I did this for a Halloween party, and they disappeared in minutes.
Pumpkin Spice Latte Version: Add 1 tablespoon of instant espresso powder to the dry ingredients and use brewed coffee instead of milk. The coffee enhances the pumpkin flavor and gives the donut holes a subtle mocha note. This is my personal favorite fall variation.
Serving & Storage Suggestions
These donut holes are best served warm, right after they’ve been coated. The contrast between the crunchy cinnamon sugar exterior and the soft, tender interior is at its peak within the first hour. Serve them on a pretty plate or in a lined basket for a cozy fall presentation.
They pair beautifully with a hot cup of coffee, chai latte, or even a glass of cold milk. For a brunch spread, arrange them alongside other fall favorites like apple cider, pumpkin bread, or a warm fruit compote. I’ve also served them as a dessert after a hearty soup dinner, and they’re always a hit.
Storage: Store any leftovers in an airtight container at room temperature for up to 2 days. The coating will soften slightly over time, but they’ll still be delicious. If you want to re-crisp the coating, pop them in a 300°F (150°C) oven for 3-4 minutes, then let them cool for a minute before serving.
Freezing: You can freeze the uncoated donut holes for up to 2 months. Let them cool completely, then place them in a single layer on a baking sheet and freeze until solid (about 1 hour). Transfer to a freezer-safe bag or container. When you’re ready to enjoy them, thaw at room temperature, then warm them in a 300°F oven for 5 minutes before coating with butter and cinnamon sugar.
Make-Ahead Tip: You can prepare the dry ingredient mix and the cinnamon sugar coating up to a week in advance. Store them separately in airtight containers. When you’re ready to bake, just whisk in the wet ingredients and you’re good to go. This makes them perfect for unexpected guests or lazy Sunday mornings.
Nutritional Information & Benefits
Here’s the thing—these are donut holes, so they’re not exactly health food. But they’re baked, not fried, which makes them a lighter option than traditional donuts. Plus, pumpkin puree is packed with vitamin A, fiber, and antioxidants. So there’s that.
Here’s the approximate nutritional breakdown per donut hole (based on 24 servings):
- Calories: 95
- Fat: 4g
- Carbohydrates: 14g
- Fiber: 1g
- Sugar: 9g
- Protein: 1.5g
- Vitamin A: 35% of the Daily Value
Pumpkin is rich in beta-carotene, which supports eye health and immune function. The cinnamon in the coating has anti-inflammatory properties and may help regulate blood sugar levels. Plus, using whole wheat pastry flour (if you choose to swap) adds extra fiber and nutrients.
Dietary Considerations: This recipe can be made gluten-free and dairy-free with the substitutions mentioned above. It is not suitable for a low-carb or keto diet due to the sugar and flour content. For a lower-sugar option, you can reduce the sugar in the batter to ⅓ cup and use a sugar substitute like monk fruit sweetener for the coating.
Frequently Asked Questions
Can I use fresh pumpkin instead of canned?
Yes, you can. If using fresh pumpkin, make sure to puree it until very smooth and drain off any excess liquid. Fresh pumpkin tends to be more watery than canned, so you may need to reduce the milk by a tablespoon or two. I recommend roasting the pumpkin first for the best flavor—steaming can make it too watery.
Why did my donut holes come out dense?
This usually happens for one of three reasons: overmixing the batter, using old baking powder, or overfilling the muffin cups. Overmixing develops gluten, which makes them tough. Old baking powder won’t give enough rise. Overfilling prevents the donut holes from rising properly. Check all three next time, and you’ll get light, fluffy donut holes.
Can I make these in a regular muffin tin?
You can, but the baking time will change significantly. For a regular 12-cup muffin tin, fill each cup about ⅔ full and bake for 15-18 minutes. You’ll get more of a muffin-like texture rather than donut holes. If you want that authentic donut hole shape and texture, stick with the mini muffin tin.
How do I get the cinnamon sugar to stick better?
The key is brushing the donut holes with melted butter while they’re still warm. If the butter is too cold or the donut holes have cooled completely, the sugar won’t adhere well. Work in small batches—coat 6-8 donut holes at a time while they’re still warm to the touch.
Can I double this recipe?
Absolutely. This recipe doubles beautifully. Just make sure you have two mini muffin tins, or bake in batches. The batter can sit at room temperature for about 30 minutes without issue, but don’t let it sit longer than that or the baking powder will lose its effectiveness.
Conclusion
These baked cinnamon sugar pumpkin donut holes have become a staple in my fall baking rotation, and I hope they become one in yours too. They’re quick, simple, and somehow manage to feel both indulgent and wholesome at the same time. The warm spices, the tender crumb, that crackly cinnamon sugar coating—it’s everything I love about fall baking in one little bite-sized package.
I love that this recipe is forgiving enough for a beginner baker but impressive enough to bring to a gathering. You can customize the spices, switch up the coating, or keep it exactly as written. However you make them, I promise they’ll bring a little warmth to your kitchen and a smile to your face.
I’d love to hear how these turn out for you! Drop a comment below and let me know if you tried any variations or if these became a new fall tradition in your home. And if you’re looking for more cozy fall recipes, you might also enjoy my pumpkin bread or these apple cider donuts. Happy baking, friends!
Pin This Recipe!
Baked Cinnamon Sugar Pumpkin Donut Holes
These baked cinnamon sugar pumpkin donut holes are a quick and easy fall treat. They’re baked, not fried, and have a tender, moist interior with a crackly cinnamon sugar coating.
- Prep Time: 15 minutes
- Cook Time: 10 minutes
- Total Time: 25 minutes
- Yield: 24 donut holes 1x
- Category: Dessert
- Cuisine: American
Ingredients
- 1 ½ cups (180g) all-purpose flour
- ½ cup (100g) granulated sugar
- 1 ½ teaspoons baking powder
- 1 ½ teaspoons pumpkin pie spice
- ½ teaspoon cinnamon
- ½ teaspoon salt
- ¾ cup (170g) pumpkin puree
- 1 large egg
- ¼ cup (60ml) milk
- 2 tablespoons (28g) melted butter
- 1 teaspoon vanilla extract
- 3 tablespoons (42g) melted butter (for coating)
- ½ cup (100g) granulated sugar (for coating)
- 1 ½ teaspoons cinnamon (for coating)
Instructions
- Preheat your oven to 350°F (175°C). Spray a 24-cup mini muffin tin generously with non-stick spray.
- In a medium mixing bowl, whisk together the dry ingredients: 1 ½ cups all-purpose flour, ½ cup granulated sugar, 1 ½ teaspoons baking powder, 1 ½ teaspoons pumpkin pie spice, ½ teaspoon cinnamon, and ½ teaspoon salt.
- In a separate small bowl, whisk together the wet ingredients: ¾ cup pumpkin puree, 1 large egg, ¼ cup milk, 2 tablespoons melted butter, and 1 teaspoon vanilla extract until smooth.
- Pour the wet ingredients into the dry ingredients. Stir with a spatula or wooden spoon until just combined. Do not overmix.
- Fill the mini muffin cups using a 1-tablespoon cookie scoop or small spoon, filling each cup about ¾ full.
- Bake for 8-10 minutes, until a toothpick inserted into the center comes out clean or with a few moist crumbs.
- Let them cool in the pan for 2 minutes, then gently loosen the edges and transfer to a cooling rack.
- While still warm, brush each donut hole with melted butter (3 tablespoons total).
- Place the warm, buttered donut holes in a Ziploc bag with the coating mixture (½ cup granulated sugar and 1 ½ teaspoons cinnamon). Seal and shake gently to coat evenly.
- Transfer to a plate or serving platter. Let cool for 2-3 minutes before serving.
Notes
Don’t overmix the batter to avoid tough donut holes. Use room temperature ingredients for best results. Check baking powder freshness. Work quickly when coating to ensure the sugar sticks. Let cool in pan for exactly 2 minutes before removing.
Nutrition
- Serving Size: 1 donut hole
- Calories: 95
- Sugar: 9
- Sodium: 85
- Fat: 4
- Saturated Fat: 2
- Carbohydrates: 14
- Fiber: 1
- Protein: 1.5
Keywords: pumpkin donut holes, baked donut holes, cinnamon sugar, fall recipe, easy pumpkin recipe



