Love this? Save it for later!
Share the inspiration with your friends
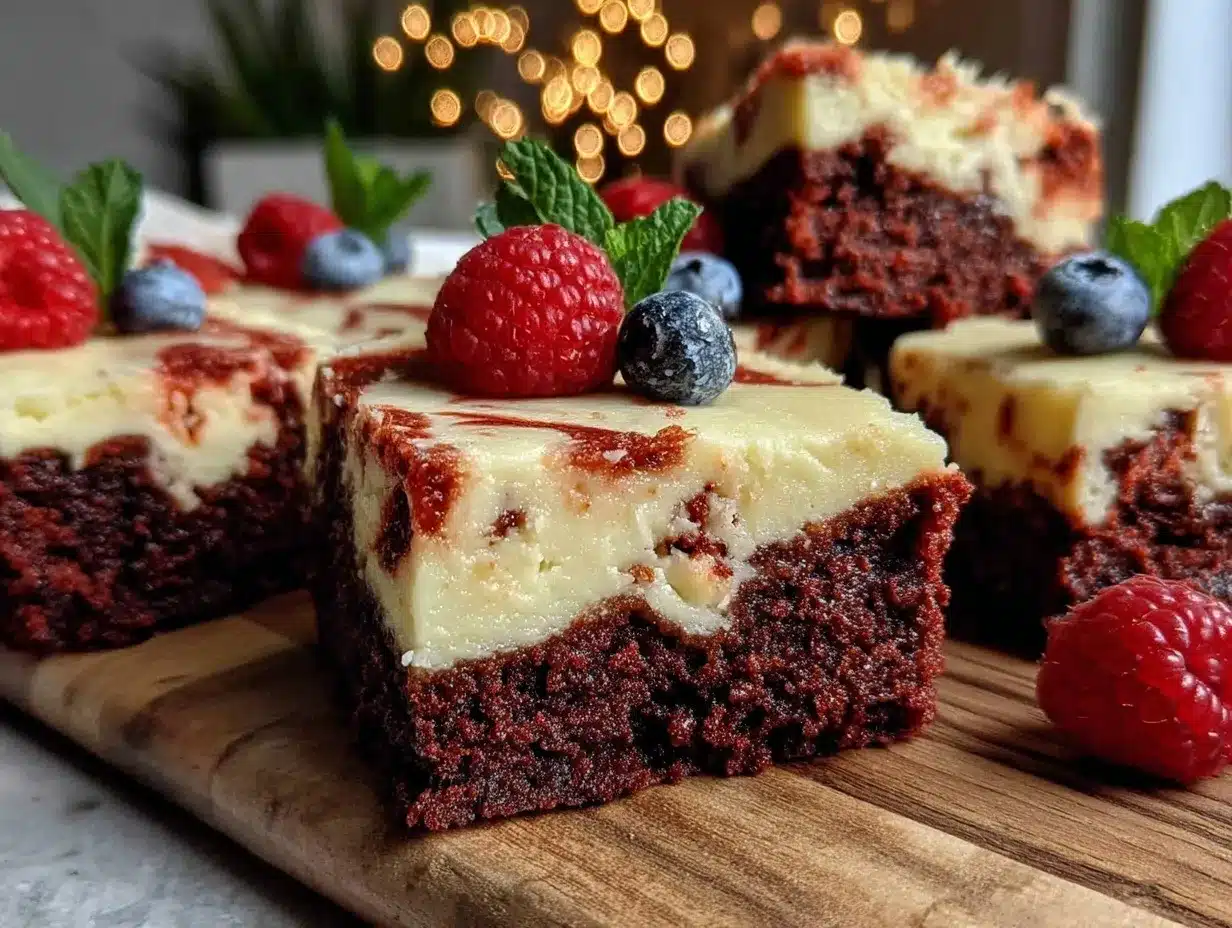
“I never thought I’d be the person to obsess over a dessert bar,” my friend Jen confessed last Friday night as we gathered around my kitchen island. Honestly, I get it—desserts can be hit or miss, especially when they try to do too much. But these Decadent Red Velvet Cheesecake Brownie Bars with Berry Topping? They’re something else.
It all started on a rainy Thursday afternoon when I was scrambling to bring something impressive to a last-minute book club gathering. The pantry was looking sad, and I had exactly zero time to make anything fancy. I grabbed a few things—cream cheese, cocoa powder, and some leftover red food coloring—and just started mixing. The result was a happy accident: a luscious, rich brownie layered with tangy cheesecake swirled with that classic red velvet charm, finished off with a simple, fresh berry topping that cut through the richness perfectly.
You know that feeling when a dessert hits all the right notes? Creamy, fudgy, a little tangy, and just sweet enough? Yeah, that’s this recipe. And let me tell you, Jen’s reaction was the icing on the cake—she went back for thirds, and so did everyone else. Maybe you’ve been there, faced with a dessert dilemma and ended up with something unexpectedly brilliant. This recipe stayed with me ever since because it’s not just a treat; it’s a conversation starter, a crowd-pleaser, and honestly, one of my favorite ways to make red velvet feel fresh and fun.
Why You’ll Love This Recipe
From my countless kitchen trials and late-night taste tests, I can say these red velvet cheesecake brownie bars are truly a game changer. Here’s why you’ll want to keep this recipe close:
- Quick & Easy: Comes together in under an hour, perfect for when you need a show-stopping dessert but don’t have hours to spend.
- Simple Ingredients: No need for fancy or hard-to-find items—most are pantry staples or easy to find at your local store.
- Perfect for Any Occasion: Whether it’s a cozy night in, a potluck, or a festive holiday, these bars fit right in.
- Crowd-Pleaser: Kids and adults alike rave about the creamy cheesecake layer paired with the rich, fudgy brownie.
- Unbelievably Delicious: The texture is just right—dense but moist, with that signature red velvet tang and a fresh burst from the berries on top.
This isn’t just another brownie or cheesecake recipe. The secret is in the layering and the berry topping—fresh, lightly sweetened berries that balance the richness without overpowering it. I’ve tested versions with frozen berries and jams, but honestly, fresh tastes best here. Plus, the cream cheese mixture is whipped just enough to be silky smooth but still holds its shape beautifully.
It’s one of those recipes that makes you close your eyes after the first bite and smile, knowing you nailed it. Whether you want to impress guests or just treat yourself, these bars bring all the comfort and indulgence without being complicated.
What Ingredients You Will Need
This recipe uses simple, wholesome ingredients to deliver bold flavor and satisfying texture without the fuss. Most of these are pantry staples, and you can easily swap a few based on what you have on hand.
- For the Brownie Layer:
- Unsalted butter, 1/2 cup (115g), melted (I like Kerrygold for its creamy flavor)
- Granulated sugar, 1 cup (200g)
- Large egg, room temperature
- Vanilla extract, 1 teaspoon
- Cocoa powder, 1/3 cup (35g), unsweetened
- All-purpose flour, 3/4 cup (95g)
- Red food coloring, 1 tablespoon (gel or liquid works fine)
- Salt, 1/4 teaspoon
- For the Cheesecake Layer:
- Cream cheese, 8 ounces (225g), softened (Philadelphia is a reliable choice)
- Granulated sugar, 1/3 cup (65g)
- Large egg, room temperature
- Vanilla extract, 1/2 teaspoon
- All-purpose flour, 1 tablespoon (optional, helps with stability)
- For the Berry Topping:
- Mixed fresh berries (strawberries, blueberries, raspberries), about 1 cup (150g)
- Honey or maple syrup, 1 tablespoon (adjust to taste)
- Fresh lemon juice, 1 teaspoon (adds brightness)
If you want to make this gluten-free, swapping the all-purpose flour for a 1:1 gluten-free baking flour works well. For a dairy-free option, try using a vegan cream cheese and coconut oil instead of butter. I’ve done both, and the texture stays delightfully creamy and rich.
Equipment Needed
- 8×8-inch (20×20 cm) baking pan – I prefer glass pans for even baking, but non-stick metal pans work too.
- Mixing bowls – at least two, one for the brownie batter and one for the cheesecake layer.
- Hand mixer or stand mixer – makes whipping the cheesecake layer smooth and easy.
- Measuring cups and spoons – precise measurements really matter here.
- Rubber spatula – for folding ingredients gently without deflating your batter.
- Whisk – handy for blending wet ingredients smoothly.
- Fine mesh sieve (optional) – to sift cocoa powder for a lump-free brownie layer.
If you don’t have a hand mixer, a sturdy whisk and some muscle can work, but expect a bit more elbow grease. For the baking pan, lining it with parchment paper helps with easy removal and cleaner edges. I’ve tried silicone pans too, but they sometimes produce slightly softer edges, so I prefer the sturdier glass or metal.
Preparation Method
- Preheat your oven to 350°F (175°C). Lightly grease your 8×8-inch pan or line it with parchment paper, leaving an overhang for easy removal later. This step saves you some mess afterward.
- Make the brownie batter: In a medium bowl, whisk together the melted butter and sugar until smooth and glossy, about 1-2 minutes. Add the egg and vanilla extract, mixing until well combined.
- Sift the cocoa powder, flour, and salt into the wet mixture. Gently fold with a spatula until just combined—don’t overmix or the brownies will be tough. Stir in the red food coloring until the batter is a vibrant red hue. It should look smooth and thick.
- Spread half of the brownie batter evenly into the prepared pan. Use your spatula to smooth the surface but don’t press too hard.
- Prepare the cheesecake layer: In a separate bowl, beat the softened cream cheese with sugar until creamy and no lumps remain, about 2-3 minutes using a hand mixer.
- Add the egg, vanilla extract, and flour (if using) to the cream cheese mixture. Mix until smooth and silky. This layer should be thick but spreadable.
- Pour and spread the cheesecake mixture evenly over the brownie base. Then dollop the remaining brownie batter on top in spoonfuls. Use a knife or skewer to swirl the layers gently, creating a marbled effect.
- Bake for 35-40 minutes. The edges should be set and slightly pulling away from the pan, while the center remains a bit wobbly but not liquid. (Ovens vary, so keep an eye after 30 minutes.)
- While baking, prepare the berry topping: In a small bowl, gently toss the mixed berries with honey and lemon juice. Set aside to macerate and release their juices.
- Once baked, cool the bars completely in the pan on a wire rack. Chill in the refrigerator for at least 2 hours to set fully—this step is key for clean slices.
- Before serving, spoon the berry topping evenly over the bars. Cut into squares using a sharp knife—wipe the blade between cuts for neat edges.
Pro tip: If you find the cheesecake layer cracking, it usually means the oven was too hot or it baked too long. Pull them out when there’s still a slight jiggle in the center; they’ll firm up as they cool.
Cooking Tips & Techniques
The trick to these bars is balancing textures and timing. Here’s what I’ve learned through trial and error:
- Softened cream cheese matters: If it’s cold, you’ll get lumps. I like to leave it out 30 minutes before mixing or microwave for 10 seconds if I’m impatient.
- Don’t overmix the brownie batter: Overworking the flour develops gluten, making brownies cakey instead of dense and fudgy.
- Swirling technique: Use a toothpick or butter knife, swirling gently—too much mixing blends the layers and loses that pretty marble look.
- Watch your bake time closely: Every oven is different. When the edges look set and the center jiggles slightly, they’re ready.
- Cooling and chilling: Letting the bars cool completely before chilling prevents sogginess and helps them slice cleanly.
- Berry selection: Fresh is best! Frozen berries work but release more juice, which can make the topping watery.
- Multitasking: While the bars bake, prep your berry topping and clean up for a smooth finish.
I once forgot to add the red food coloring (yes, it happens!), and while the flavor was spot on, the bars looked more like chocolate cheesecake bars. Lesson learned: don’t skip the color—it’s half the fun!
Variations & Adaptations
This recipe is flexible enough to suit different tastes and dietary needs. Here are some ways I’ve tweaked it:
- Chocolate swirl: Add mini chocolate chips to the brownie batter for extra bursts of melty goodness.
- Nutty crunch: Sprinkle chopped walnuts or pecans on top before baking for a textural contrast.
- Vegan adaptation: Use flax eggs (1 tablespoon ground flaxseed + 3 tablespoons water per egg), vegan cream cheese, and coconut oil instead of butter. The texture shifts slightly but stays delicious.
- Seasonal fruit toppings: In summer, swap the berry mix for sliced peaches or mango with a drizzle of honey.
- Spiced twist: Add a pinch of cinnamon or chili powder to the brownie batter for warmth and subtle heat.
One personal favorite is adding a thin layer of raspberry jam between the brownie and cheesecake layers—it brings a concentrated berry punch that pairs beautifully with the fresh topping.
Serving & Storage Suggestions
These bars are best served chilled or at room temperature. The berry topping is a refreshing counterpoint to the rich layers, so I like to add it just before serving to keep the berries vibrant and fresh.
For an extra touch, dust lightly with powdered sugar or garnish with a sprig of fresh mint. They also pair wonderfully with a cup of black coffee or a glass of cold milk—perfect comfort food vibes.
Store leftovers in an airtight container in the refrigerator for up to 4 days. You can freeze them (berry topping off) wrapped tightly in plastic wrap and foil for up to 2 months. Thaw overnight in the fridge.
When reheating, warm gently in the microwave for 10-15 seconds or let come to room temperature—warm cheesecake can get a little runny, so I prefer them chilled.
Flavors meld beautifully after a day, so if you can resist, make these a day ahead for even better taste.
Nutritional Information & Benefits
Each bar contains roughly 280 calories, with a balanced mix of fats, proteins, and carbs. The cream cheese provides a good dose of calcium and protein, while the cocoa powder offers antioxidants. The fresh berries add fiber, vitamin C, and natural sweetness, making this treat a bit more wholesome than your average brownie.
This recipe can be adapted to be gluten-free or dairy-free, accommodating common dietary preferences. Just keep in mind that substitutions might alter texture slightly.
While indulgent, these bars are a satisfying way to enjoy dessert mindfully, especially when paired with fresh fruit.
Conclusion
So there you have it—my go-to recipe for Decadent Red Velvet Cheesecake Brownie Bars with Berry Topping that’s as easy as it is unforgettable. Whether you’re baking for a crowd or just craving a special treat, these bars bring creamy, fudgy, berry-bright joy to every bite.
I love how this recipe invites customization and feels approachable, even if you’re not a seasoned baker. Honestly, it’s one of those recipes that’s become a staple in my kitchen because it never fails to impress without the stress.
Give it a try, and let me know how your batch turns out! I’d love to hear your favorite twists or berry combos. Don’t be shy—share your thoughts and spread the joy of this delicious dessert!
FAQs
Can I make these bars ahead of time?
Absolutely! They actually taste better after chilling for a few hours or overnight. Just add the berry topping before serving.
What’s the best way to store leftovers?
Store in an airtight container in the fridge for up to 4 days. You can also freeze the bars without the berry topping for up to 2 months.
Can I use frozen berries for the topping?
You can, but frozen berries release more juice and might make the topping watery. If you use frozen, drain excess liquid before serving.
Is there a gluten-free option?
Yes, swap the all-purpose flour for a 1:1 gluten-free flour blend. It works well and keeps the texture close to the original.
How do I avoid cracks in the cheesecake layer?
Don’t overbake and avoid mixing the cheesecake batter too vigorously. Pull the bars out when the center still jiggles slightly—they’ll firm up as they cool.
Pin This Recipe!
Decadent Red Velvet Cheesecake Brownie Bars Recipe with Easy Berry Topping
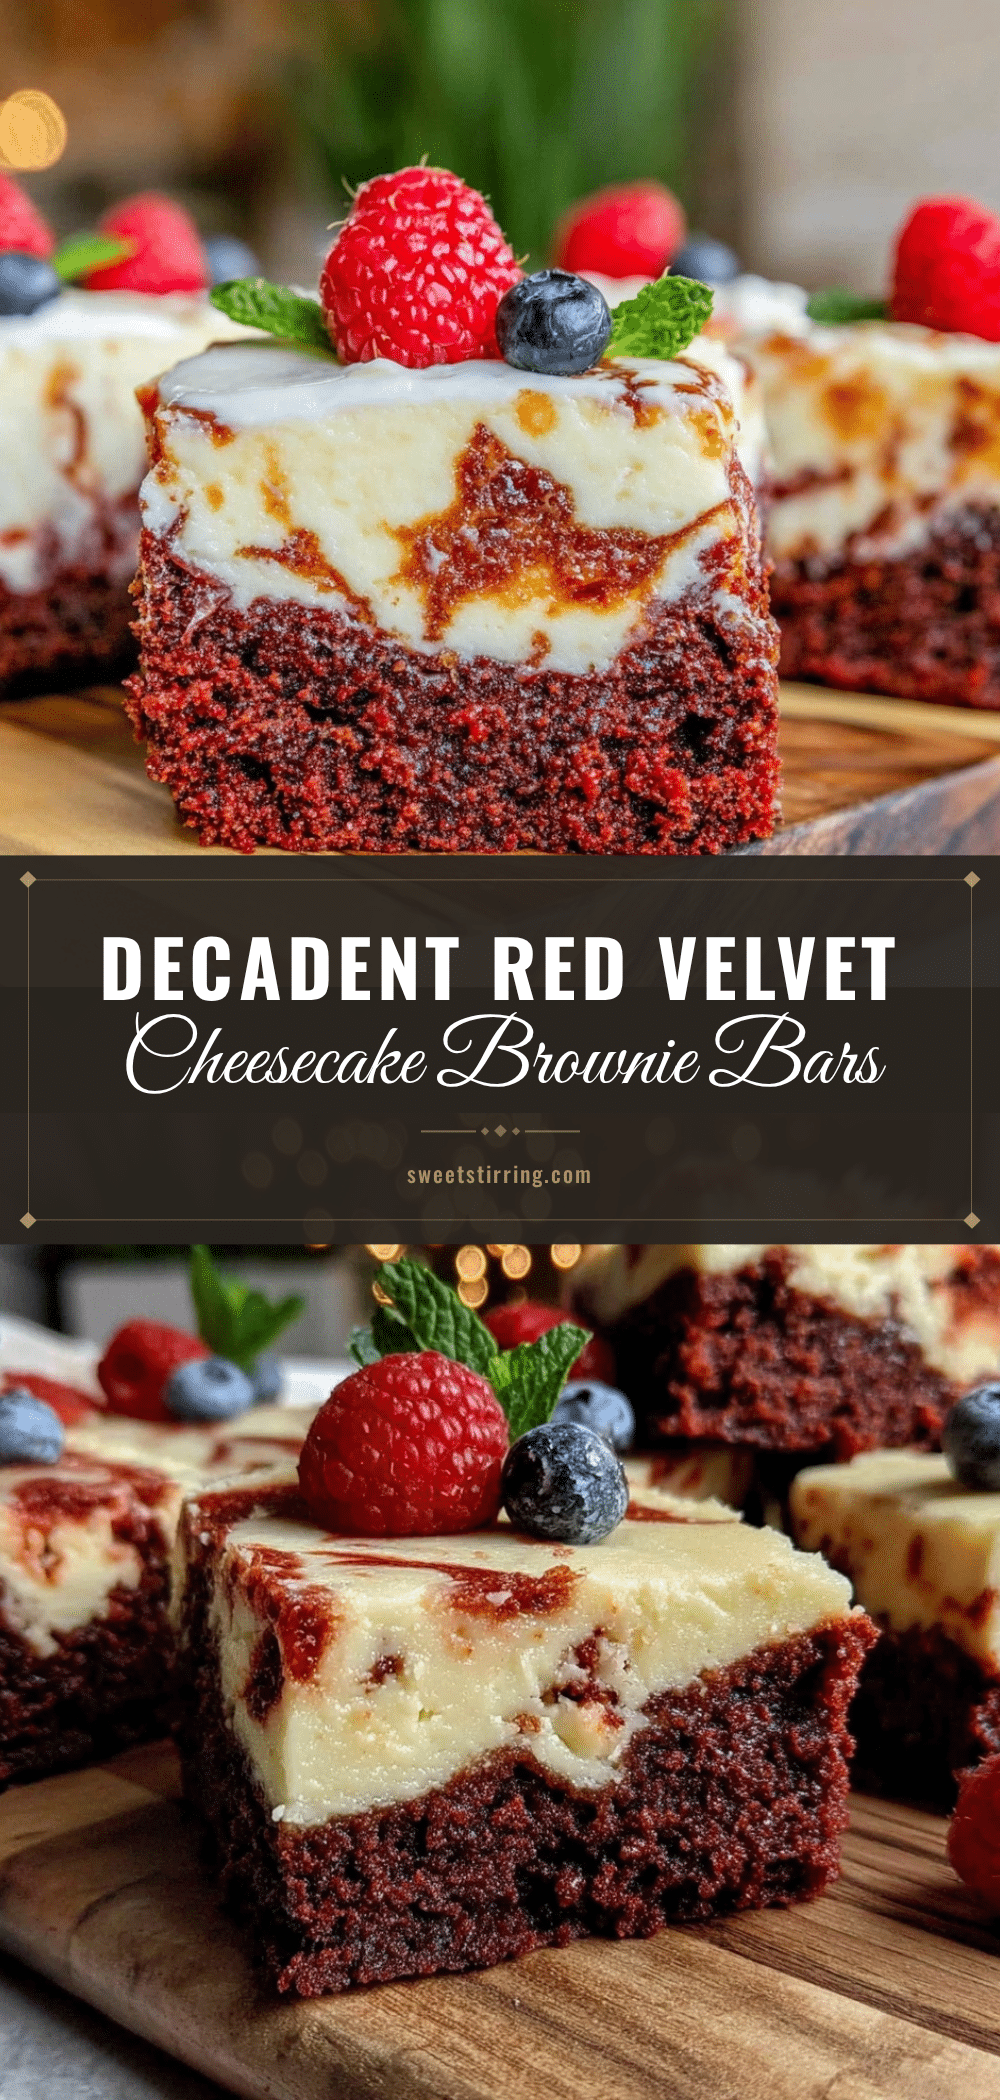
These decadent red velvet cheesecake brownie bars feature a rich, fudgy brownie base layered with tangy cheesecake and topped with a fresh, lightly sweetened berry topping. Perfect for any occasion, they are creamy, dense, and bursting with flavor.
- Prep Time: 15 minutes
- Cook Time: 35-40 minutes
- Total Time: 2 hours 50 minutes
- Yield: 16 bars 1x
- Category: Dessert
- Cuisine: American
Ingredients
- 1/2 cup (115g) unsalted butter, melted
- 1 cup (200g) granulated sugar
- 1 large egg, room temperature
- 1 teaspoon vanilla extract
- 1/3 cup (35g) unsweetened cocoa powder
- 3/4 cup (95g) all-purpose flour
- 1 tablespoon red food coloring (gel or liquid)
- 1/4 teaspoon salt
- 8 ounces (225g) cream cheese, softened
- 1/3 cup (65g) granulated sugar
- 1 large egg, room temperature
- 1/2 teaspoon vanilla extract
- 1 tablespoon all-purpose flour (optional)
- 1 cup (150g) mixed fresh berries (strawberries, blueberries, raspberries)
- 1 tablespoon honey or maple syrup (adjust to taste)
- 1 teaspoon fresh lemon juice
Instructions
- Preheat your oven to 350°F (175°C). Lightly grease an 8×8-inch baking pan or line it with parchment paper, leaving an overhang for easy removal.
- Make the brownie batter: In a medium bowl, whisk together the melted butter and sugar until smooth and glossy, about 1-2 minutes. Add the egg and vanilla extract, mixing until well combined.
- Sift the cocoa powder, flour, and salt into the wet mixture. Gently fold with a spatula until just combined. Stir in the red food coloring until the batter is a vibrant red hue.
- Spread half of the brownie batter evenly into the prepared pan, smoothing the surface gently.
- Prepare the cheesecake layer: In a separate bowl, beat the softened cream cheese with sugar until creamy and no lumps remain, about 2-3 minutes using a hand mixer.
- Add the egg, vanilla extract, and flour (if using) to the cream cheese mixture. Mix until smooth and silky.
- Pour and spread the cheesecake mixture evenly over the brownie base. Dollop the remaining brownie batter on top in spoonfuls and swirl gently with a knife or skewer to create a marbled effect.
- Bake for 35-40 minutes until edges are set and slightly pulling away from the pan, and the center is slightly wobbly but not liquid.
- While baking, prepare the berry topping: In a small bowl, gently toss the mixed berries with honey and lemon juice. Set aside to macerate.
- Cool the bars completely in the pan on a wire rack. Chill in the refrigerator for at least 2 hours to set fully.
- Before serving, spoon the berry topping evenly over the bars. Cut into squares using a sharp knife, wiping the blade between cuts for neat edges.
Notes
Use softened cream cheese to avoid lumps. Do not overmix the brownie batter to keep it dense and fudgy. Swirl the layers gently for a marbled effect. Pull bars out of the oven when the center still jiggles slightly to avoid cracking. Chill bars for at least 2 hours for clean slicing. Fresh berries are preferred for the topping to avoid watery texture.
Nutrition
- Serving Size: 1 bar (1/16th of rec
- Calories: 280
- Sugar: 22
- Sodium: 180
- Fat: 15
- Saturated Fat: 8
- Carbohydrates: 32
- Fiber: 2
- Protein: 4
Keywords: red velvet, cheesecake, brownie bars, berry topping, dessert bars, easy dessert, crowd-pleaser, layered dessert