Love this? Save it for later!
Share the inspiration with your friends
I wasn’t expecting dessert advice from my plumber, but there I was, standing in my kitchen while he fixed a leaky faucet, listening to him describe exactly how to make an Easy No-Bake S’mores Icebox Cake. His name was Frank, and he’d been fixing pipes in my neighborhood for thirty years. Between tightening a wrench and checking the water pressure, he casually mentioned that his wife made this dessert every Fourth of July. “She layers graham crackers with chocolate pudding and marshmallows,” he said, wiping his hands on a rag. “People go crazy for it.” Honestly, I almost laughed. Here was a guy who spent his days under sinks and in crawl spaces, and he was giving me what would become my most-requested summer dessert recipe.
I scribbled his instructions on a crumpled receipt while he worked. The thing is, I’d been looking for a no-bake dessert that could handle the summer heat without turning my kitchen into a sauna. Maybe you’ve been there—standing in front of your oven in July, wondering why anyone would voluntarily turn on a 400-degree appliance. Frank’s Easy No-Bake S’mores Icebox Cake was the answer I didn’t know I needed. It had all the flavors of a campfire s’more but without the smoke in your eyes or the sticky fingers.
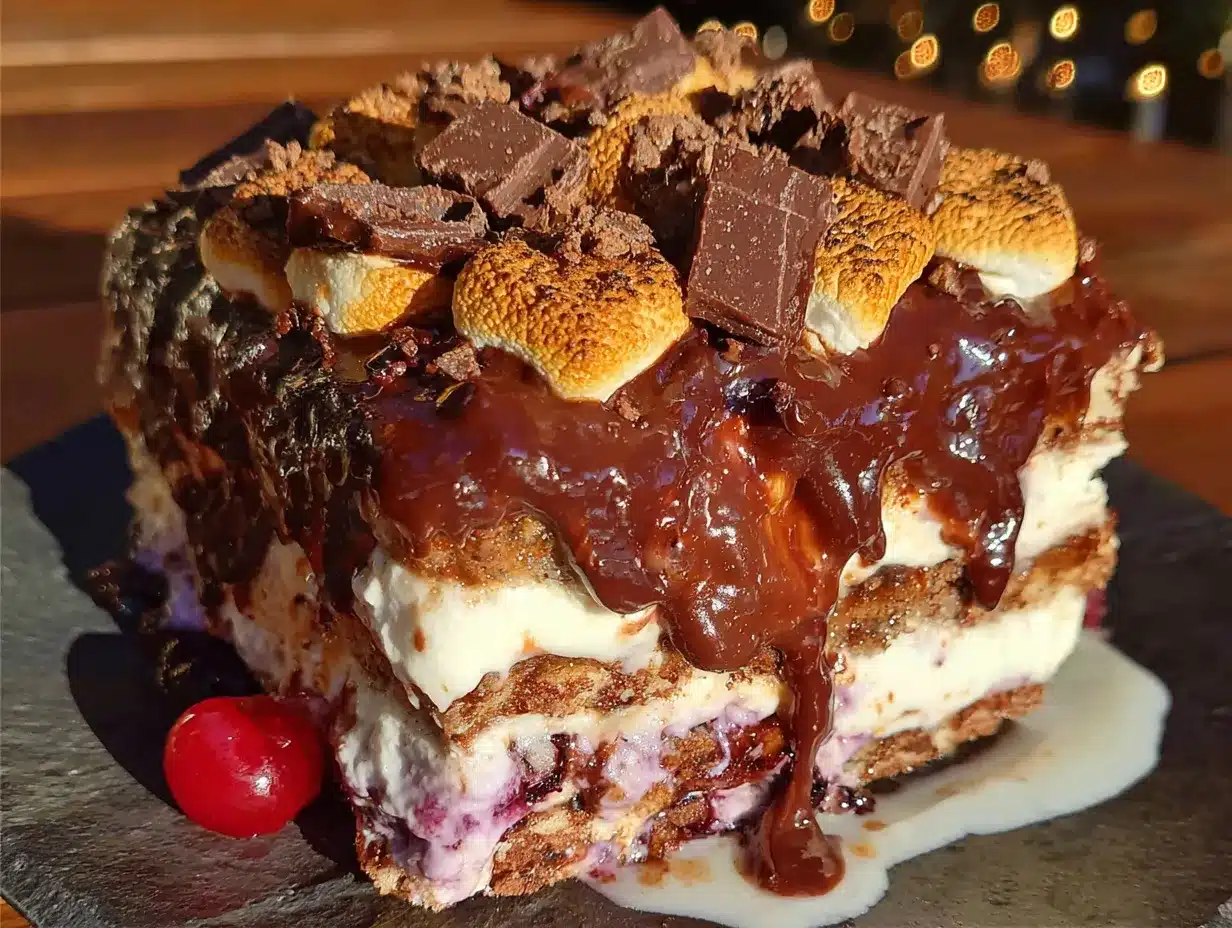
That first bite made me close my eyes. The creamy chocolate filling, the slight crunch of the graham crackers, the pillowy marshmallow topping—it was everything a s’more should be, just colder and somehow better. I’ve made this cake at least a dozen times since that day, and every single time, someone asks for the recipe. It’s the kind of dessert that makes people think you spent hours in the kitchen when really, you just layered things in a pan and let the refrigerator do all the work. And honestly, that’s my favorite kind of cooking.
Why You’ll Love This Recipe
Let me tell you why this Easy No-Bake S’mores Icebox Cake has become my summer survival strategy. After testing it for various gatherings—from backyard barbecues to casual weeknight dinners—I can confidently say this recipe delivers on every front.
- No Oven Required: When the temperature hits 90 degrees, the last thing you want to do is bake. This dessert comes together on your countertop and sets up in the fridge. No sweat, literally.
- Simple Ingredients: You likely have most of these items in your pantry right now. Graham crackers, chocolate pudding mix, milk, marshmallows, and a few extras. No fancy grocery store runs required.
- Perfect for Summer Gatherings: Whether it’s a pool party, a potluck, or a casual family dinner, this cake feeds a crowd and travels well. It’s basically the unofficial dessert of summer.
- Crowd-Pleaser: I’ve served this to kids, adults, and even my picky neighbor who claims she doesn’t like sweets. Every single person went back for seconds. It’s magic, I swear.
- Unbelievably Delicious: The texture is what gets me every time. The graham crackers soften into a cake-like consistency while the pudding layer stays rich and creamy. It’s comfort food that doesn’t weigh you down.
What makes this recipe different from other no-bake desserts is the layering technique. Instead of just mixing everything together, you build the cake like a lasagna—alternating graham crackers with chocolate pudding. This creates distinct layers that hold their shape when sliced. Plus, the marshmallow topping gets lightly toasted under the broiler for that authentic campfire flavor. It’s not just another version of a no-bake cake; it’s the best version I’ve ever tasted.
This recipe is the kind that makes you close your eyes after the first bite. It’s comfort food reimagined—faster, cooler, but with the same soul-soothing satisfaction. Perfect for impressing guests without stress, or turning a simple Tuesday night into something memorable.
What Ingredients You Will Need
This Easy No-Bake S’mores Icebox Cake uses simple, pantry-friendly ingredients to deliver that classic campfire flavor without the fire. Here’s what you’ll need to gather before you start layering.
For the Chocolate Pudding Layer
- 2 boxes (3.9 ounces each) instant chocolate pudding mix — I recommend Jell-O brand for consistent results, but any brand works fine.
- 3 cups cold whole milk — Whole milk gives the richest texture, but 2% works too. Avoid skim milk; the pudding won’t set as firmly.
- 1 teaspoon vanilla extract — Pure vanilla adds depth to the chocolate flavor. Imitation works in a pinch.
For the Cake Layers
- 1 box (14.4 ounces) graham crackers — You’ll need about 24 full sheets. Honey grahams are classic, but cinnamon or chocolate grahams work beautifully for a twist.
- 2 cups heavy whipping cream — For the whipped topping layer. You can substitute with 2 cups of store-bought whipped topping (like Cool Whip) if you’re short on time.
- 2 tablespoons powdered sugar — To sweeten the whipped cream just enough.
For the Topping
- 1 bag (10 ounces) mini marshmallows — Regular marshmallows work too, but mini ones distribute more evenly and toast more quickly.
- 1/2 cup semisweet chocolate chips — For drizzling over the top. Milk chocolate or dark chocolate chips both work great.
- 1 tablespoon coconut oil or vegetable oil — Helps the chocolate drizzle smoothly.
Ingredient Selection Tips
For the best texture, use instant pudding mix, not cook-and-serve. Instant sets up firm in the fridge, which is exactly what you need for clean slices. If you’re dairy-free, you can substitute oat milk for the pudding and coconut cream for the whipped topping. Just know the texture will be slightly less firm. Look for graham crackers that are fresh and crisp—stale crackers won’t soften properly and can leave hard spots in your cake.
Equipment Needed
You don’t need fancy equipment for this Easy No-Bake S’mores Icebox Cake, which is part of its charm. Here’s what you’ll want to have on hand.
- 9×13-inch baking dish — This is the ideal size for getting enough layers. A glass dish works best so you can see the layers.
- Electric hand mixer or stand mixer — For whipping the cream. A whisk and some elbow grease work too, but your arm will thank you for using a mixer.
- Large mixing bowl — For the pudding and the whipped cream.
- Rubber spatula — For spreading layers evenly.
- Aluminum foil or plastic wrap — To cover the cake while it chills.
- Small microwave-safe bowl — For melting the chocolate drizzle.
- Broiler-safe dish or baking sheet — Only if you plan to toast the marshmallows under the broiler. A kitchen torch works too, and it’s honestly more fun.
If you don’t have a 9×13 dish, you can use two 8×8 square dishes instead. Just reduce the number of layers in each. I’ve also made this in a deep 9-inch round springform pan for a taller, more dramatic presentation. The key is to make sure your dish fits in your refrigerator with enough space for the cake to set undisturbed for at least 6 hours.
Preparation Method
Making this Easy No-Bake S’mores Icebox Cake is straightforward, but following the steps in order makes everything come together smoothly. Let me walk you through it.
Step 1: Make the Chocolate Pudding
In a large mixing bowl, whisk together the two boxes of instant chocolate pudding mix with 3 cups of cold whole milk. Whisk vigorously for about 2 minutes until the mixture thickens. Add the vanilla extract and stir to combine. The pudding will be quite thick—that’s what you want. Set it aside for 5 minutes to fully set while you prepare the other components.
Step 2: Whip the Cream
In a separate bowl, pour 2 cups of heavy whipping cream. Add 2 tablespoons of powdered sugar. Using an electric hand mixer on medium-high speed, beat the cream until stiff peaks form. This takes about 3-4 minutes. You’ll know it’s ready when you lift the beaters and the cream stands up in firm peaks without drooping. Be careful not to over-whip, or you’ll end up with butter. If you’re using store-bought whipped topping, skip this step and just measure out 2 cups.
Step 3: Fold the Whipped Cream into the Pudding
Take about one-third of the whipped cream and stir it into the chocolate pudding to lighten the mixture. Then gently fold in the remaining whipped cream using a rubber spatula. Fold until no white streaks remain. This creates a mousse-like filling that’s lighter than plain pudding. Set this aside.
Step 4: Line the Baking Dish
Cover the bottom of your 9×13-inch baking dish with a single layer of graham crackers. You’ll need to break some crackers to fit the edges. Don’t stress about perfection—the cracks will fill in as the cake sets. I usually arrange them in a single, tight layer with minimal gaps.
Step 5: Start Layering
Spread one-third of the chocolate pudding mixture evenly over the graham crackers. Use a spatula to smooth it all the way to the edges. Add another layer of graham crackers on top, pressing them gently into the pudding. Repeat this process two more times: graham crackers, pudding, graham crackers, pudding. You should end with a final layer of graham crackers on top. You’ll have three layers of pudding and four layers of graham crackers total.
Step 6: Add the Marshmallow Topping
Spread the remaining whipped cream (if you saved some) or a fresh batch over the top layer of graham crackers. Then sprinkle the mini marshmallows evenly over the entire surface. Don’t skimp here—the marshmallows are what make this taste like a real s’more. Press them down gently so they stick to the cream.
Step 7: Chill the Cake
Cover the dish tightly with aluminum foil or plastic wrap. Refrigerate for at least 6 hours, but overnight is better. The longer it chills, the softer the graham crackers become, and the cleaner your slices will be. I’ve let mine sit for up to 24 hours with fantastic results.
Step 8: Toast the Marshmallows
About 15 minutes before serving, remove the cake from the fridge. If you have a kitchen torch, toast the marshmallows directly in the dish until golden brown. If you’re using the broiler, place the dish on a baking sheet and broil on high for 60-90 seconds. Watch it like a hawk—marshmallows go from golden to burnt in seconds. Let the cake sit for 10 minutes after toasting so the marshmallows cool slightly.
Step 9: Add the Chocolate Drizzle
In a small microwave-safe bowl, combine 1/2 cup semisweet chocolate chips with 1 tablespoon coconut oil. Microwave in 30-second intervals, stirring between each, until smooth and fully melted. Drizzle the chocolate over the toasted marshmallows using a spoon or a piping bag. Let the chocolate set for 5 minutes before slicing.
Step 10: Slice and Serve
Use a sharp knife to cut the cake into squares. Run the knife under hot water and wipe it clean between cuts for the neatest slices. Serve immediately or keep refrigerated until ready to serve.
Cooking Tips & Techniques
After making this Easy No-Bake S’mores Icebox Cake more times than I can count, I’ve picked up a few tricks that make a real difference. Let me share them so you can skip the trial-and-error phase.
Don’t Skip the Chill Time — I know it’s tempting to dig in after an hour, but the graham crackers need at least 6 hours to soften properly. If you cut into the cake too early, the crackers will be crunchy and the layers won’t hold together. Trust the process. Overnight is truly the sweet spot.
Watch the Broiler Closely — I learned this one the hard way. The first time I made this, I walked away for “just a second” and came back to a smoking kitchen and black marshmallows. Set a timer for 60 seconds and stay right there. Marshmallows can go from perfectly toasted to charcoal in about 15 seconds.
Use Room Temperature Ingredients — For the pudding, cold milk is essential for proper setting. But for the whipped cream, make sure your cream and bowl are cold. I pop my bowl and beaters in the freezer for 10 minutes before whipping. It makes a noticeable difference in volume and stability.
Press the Graham Crackers Gently — When you add each new layer of graham crackers, press them down just enough to make contact with the pudding. Too much pressure and the crackers will break apart. Too little and the layers won’t fuse. A gentle, even press with your palm does the trick.
Make Extra Drizzle — The chocolate drizzle is the finishing touch that makes this cake look professional. Double the drizzle recipe if you want extra coverage or if you’re serving it at a party. Leftover drizzle keeps in the fridge for weeks and is amazing on ice cream.
Variations & Adaptations
One of the best things about this Easy No-Bake S’mores Icebox Cake is how easy it is to customize. Here are some variations I’ve tried and loved.
Peanut Butter S’mores Cake — Add 1/2 cup creamy peanut butter to the chocolate pudding mixture before folding in the whipped cream. Swirl it in gently so you get ribbons of peanut butter throughout. The salty-sweet combo is incredible. I made this for a friend who’s obsessed with peanut butter, and she said it was the best dessert she’d ever eaten.
Berry S’mores Cake — Layer fresh strawberries, raspberries, or sliced bananas between the pudding layers. The tartness of the berries cuts through the sweetness beautifully. This is my go-to version in early summer when berries are at their peak. Just make sure to pat the berries dry so they don’t water down the pudding.
Vegan-Friendly Version — Use dairy-free chocolate pudding mix (many instant brands are accidentally vegan) with oat milk or almond milk. Substitute the heavy cream with full-fat coconut cream whipped with powdered sugar. Use vegan graham crackers and dairy-free chocolate chips. The texture is slightly different but still delicious. I tested this for a friend with dairy allergies, and she couldn’t stop eating it.
Mint Chocolate S’mores — Add 1 teaspoon peppermint extract to the pudding mixture and top with crushed peppermint candies along with the chocolate drizzle. It tastes like a Thin Mint in cake form. Perfect for holiday gatherings or when you want a refreshing twist.
Gluten-Free Option — Use gluten-free graham crackers or gluten-free vanilla wafers. Most chocolate pudding mixes are naturally gluten-free, but check the label to be safe. The texture will be slightly different with gluten-free crackers, but the flavor is just as good.
Serving & Storage Suggestions
This Easy No-Bake S’mores Icebox Cake is best served cold, straight from the refrigerator. The contrast between the cool, creamy filling and the toasted marshmallow topping is what makes it special. Here’s how to serve and store it for the best results.
Serving Temperature — Serve the cake chilled, but let it sit at room temperature for about 10 minutes after toasting the marshmallows. This takes the edge off the cold and makes the flavors more pronounced. If you serve it directly from the fridge, the pudding will be very firm and the marshmallows will be chewy.
Presentation Ideas — Cut the cake into clean squares and place each piece on a small plate. Add a drizzle of extra chocolate sauce and a sprinkle of crushed graham crackers for a professional touch. For parties, I like to serve it on a large wooden board with extra marshmallows and chocolate chips scattered around.
Complementary Dishes — This cake pairs beautifully with a scoop of vanilla ice cream or a dollop of fresh whipped cream. A cold glass of milk or a hot cup of coffee balances the sweetness perfectly. If you’re serving it at a barbecue, it goes great with grilled fruit like peaches or pineapple.
Storage Instructions — Cover the dish tightly with foil or plastic wrap and store in the refrigerator for up to 5 days. The graham crackers will continue to soften over time, so the cake will actually be more tender on day two. I actually prefer the texture on day three—it’s almost like a pudding cake.
Freezing Instructions — You can freeze this cake for up to 2 months. Prepare it without the marshmallow topping and chocolate drizzle. Wrap the dish tightly in plastic wrap, then foil. To serve, thaw in the refrigerator overnight, then add the marshmallows, toast them, and add the drizzle. The texture holds up surprisingly well.
Reheating Tips — If you’re serving leftovers, the marshmallows won’t be as toasty as day one. You can pop individual slices under the broiler for 30 seconds to re-toast the marshmallows, or use a kitchen torch. Just watch closely so the chocolate drizzle doesn’t burn.
Nutritional Information & Benefits
Let’s be honest—this Easy No-Bake S’mores Icebox Cake is a treat, not a health food. But knowing what’s in it helps you enjoy it mindfully. Here’s the estimated nutritional breakdown per serving (based on 12 servings).
| Nutrient | Amount Per Serving |
|---|---|
| Calories | 385 |
| Total Fat | 18g |
| Saturated Fat | 10g |
| Cholesterol | 45mg |
| Sodium | 420mg |
| Total Carbohydrates | 52g |
| Dietary Fiber | 2g |
| Sugars | 35g |
| Protein | 5g |
While this isn’t a low-calorie dessert, it does have some redeeming qualities. The graham crackers provide a small amount of whole grains and fiber. The milk in the pudding contributes calcium and vitamin D. Dark chocolate (if you use it for the drizzle) contains antioxidants. And honestly, sometimes you just need a dessert that makes you happy. I believe in balance—enjoy a slice, savor every bite, and don’t feel guilty about it.
Dietary Considerations: This recipe contains dairy, gluten, and soy (in the chocolate chips). For dairy-free, use the vegan adaptations mentioned above. For gluten-free, use certified gluten-free graham crackers. Always check labels on pudding mix and chocolate chips for potential allergens.
Conclusion
This Easy No-Bake S’mores Icebox Cake has become a summer staple in my kitchen, and honestly, it’s one of those recipes I’m genuinely proud to share. It started with a plumber’s tip and turned into a dessert that brings people together. There’s something magical about a cake that requires no oven, uses ingredients you probably already have, and still manages to impress everyone who tries it.
I love that this recipe is forgiving—you can tweak it, add to it, or simplify it based on what you have on hand. It’s the kind of dessert that makes you look like a hero without actually doing much work. And isn’t that the best kind of recipe?
I’d love to hear how yours turns out. Did you try one of the variations? Did you add your own twist? Drop a comment below and let me know. And if you share it on social media, tag me—I love seeing your creations. Now go make this cake. Your summer needs it.
Frequently Asked Questions
Can I make this Easy No-Bake S’mores Icebox Cake ahead of time?
Absolutely! In fact, I recommend it. You can assemble the cake completely (including the marshmallow topping and chocolate drizzle) up to 24 hours in advance. Just hold off on toasting the marshmallows until right before serving. The cake actually tastes better on day two because the graham crackers have fully softened and the flavors have melded together.
Why is my pudding not setting properly?
This usually happens for one of two reasons: either you used cook-and-serve pudding instead of instant, or your milk wasn’t cold enough. Instant pudding requires cold milk to activate the thickening agents. Make sure your milk is straight from the refrigerator, and whisk the pudding for a full 2 minutes. If it still seems thin, let it sit for 5 minutes before folding in the whipped cream.
Can I use chocolate wafers instead of graham crackers?
Yes, you can substitute chocolate wafers, vanilla wafers, or even Oreo cookies (cream removed) for the graham crackers. The texture will be different—wafers tend to be thinner and softer—but the flavor will still be delicious. If using Oreos, I recommend removing the cream filling first to prevent the cake from becoming too sweet.
How do I get clean, neat slices?
Use a sharp knife and run it under hot water before each cut. Wipe the blade clean between slices. This prevents the marshmallow and pudding from sticking to the knife. For the cleanest cuts, chill the cake for at least 8 hours or overnight. A well-chilled cake holds its shape much better than one that’s only been in the fridge for a few hours.
Can I toast the marshmallows without a broiler or torch?
If you don’t have a broiler or kitchen torch, you can skip the toasting step entirely. The cake will still taste amazing with just the soft, pillowy marshmallows on top. Alternatively, you can toast the marshmallows in a dry skillet over medium heat for 1-2 minutes per side, then arrange them on top of the cake. This method takes a bit more time but gives you that same golden-brown finish.
PrintEasy No-Bake S’mores Icebox Cake
A creamy, no-bake dessert that layers graham crackers with chocolate pudding and marshmallows, topped with toasted marshmallows and a chocolate drizzle. Perfect for summer gatherings and requires no oven.
- Prep Time: 20 minutes
- Cook Time: 2 minutes
- Total Time: 6 hours 22 minutes
- Yield: 12 servings 1x
- Category: Dessert
- Cuisine: American
Ingredients
- 2 boxes (3.9 ounces each) instant chocolate pudding mix
- 3 cups cold whole milk
- 1 teaspoon vanilla extract
- 1 box (14.4 ounces) graham crackers (about 24 full sheets)
- 2 cups heavy whipping cream
- 2 tablespoons powdered sugar
- 1 bag (10 ounces) mini marshmallows
- 1/2 cup semisweet chocolate chips
- 1 tablespoon coconut oil or vegetable oil
Instructions
- In a large mixing bowl, whisk together the two boxes of instant chocolate pudding mix with 3 cups of cold whole milk. Whisk vigorously for about 2 minutes until the mixture thickens. Add the vanilla extract and stir to combine. Set aside for 5 minutes to fully set.
- In a separate bowl, pour 2 cups of heavy whipping cream. Add 2 tablespoons of powdered sugar. Using an electric hand mixer on medium-high speed, beat the cream until stiff peaks form, about 3-4 minutes.
- Take about one-third of the whipped cream and stir it into the chocolate pudding to lighten the mixture. Then gently fold in the remaining whipped cream using a rubber spatula until no white streaks remain.
- Cover the bottom of a 9×13-inch baking dish with a single layer of graham crackers, breaking some to fit the edges.
- Spread one-third of the chocolate pudding mixture evenly over the graham crackers. Add another layer of graham crackers on top, pressing them gently into the pudding. Repeat this process two more times: graham crackers, pudding, graham crackers, pudding. You should end with a final layer of graham crackers on top.
- Spread the remaining whipped cream (if you saved some) or a fresh batch over the top layer of graham crackers. Then sprinkle the mini marshmallows evenly over the entire surface. Press them down gently so they stick to the cream.
- Cover the dish tightly with aluminum foil or plastic wrap. Refrigerate for at least 6 hours, but overnight is better.
- About 15 minutes before serving, remove the cake from the fridge. If you have a kitchen torch, toast the marshmallows directly in the dish until golden brown. If using the broiler, place the dish on a baking sheet and broil on high for 60-90 seconds. Watch closely. Let the cake sit for 10 minutes after toasting.
- In a small microwave-safe bowl, combine 1/2 cup semisweet chocolate chips with 1 tablespoon coconut oil. Microwave in 30-second intervals, stirring between each, until smooth and fully melted. Drizzle the chocolate over the toasted marshmallows. Let the chocolate set for 5 minutes before slicing.
- Use a sharp knife to cut the cake into squares. Run the knife under hot water and wipe it clean between cuts for the neatest slices. Serve immediately or keep refrigerated until ready to serve.
Notes
For best results, chill the cake overnight. Watch the broiler closely when toasting marshmallows. Use instant pudding mix, not cook-and-serve. For dairy-free, use oat milk and coconut cream. For gluten-free, use certified gluten-free graham crackers.
Nutrition
- Serving Size: 1 slice (1/12 of cak
- Calories: 385
- Sugar: 35
- Sodium: 420
- Fat: 18
- Saturated Fat: 10
- Carbohydrates: 52
- Fiber: 2
- Protein: 5
Keywords: no-bake, s'mores, icebox cake, summer dessert, chocolate, marshmallow, graham cracker